
Originally posted in March, 2010, this article from Darwin Wiggett contains some truly fundamental information about using filters for photographers to learn or review. Each time award-winning photographer and author Darwin Wiggett writes about filters, he is sharing his own years of successful experience. His stories featured on this blog have become a trusted reference source for many visitors. Now Darwin discusses the essential filters for controlling the luminance or contrast range of digital images and offers us his perspective based on his own methods, experience and equipment.

“To me, there are two types of filters that are truly essential to outdoor and nature photography, and these are the filters that help us control lighting contrast in a scene,” says Darwin. “In nature, the contrast range of a scene is often beyond what can be recorded successfully on the sensor. The range of brightness between shadows and highlights is usually so extreme that neither is recorded with detail on the sensor. There are several options available to photographers to help reduce the contrast range of light in such scenes. The first is to return to the scene when the light is lower in contrast — much like that on a cloudy day (but that will also change the character of the light). The second option is to add light to the shadow areas using fill flash or a reflector — but this solution is not too practical when shooting grand scenics. The third solution is to make numerous exposures of the scene to record detail in the shadow, highlight and midtone areas, and then blend these exposures together in post-processing. This latter practice often works well but it’s time intensive.
“The fourth option is to use the two types of filters — polarizers and graduated neutral density filters — that enable us to control the contrast in a scene to get the correctly exposed image in-camera. When possible, I prefer this last method because it gives me high quality in-camera images and requires little post-processing effort. That gives me more time in the field to take photos. Plus, I know I got what I wanted while I’m still at the location. Let’s take a close look at how polarizers and ND grads help tame the contrast in landscape and nature photography.
The Polarizer Controls Contrast Over The Entire Image
“One of the easiest ways to make better nature photos is to use a polarizer. The glare reducing effect of a polarizer can’t be duplicated in any software – period. By removing the reflective highlights (glare) everywhere in the scene, the polarizer effectively reduces the contrast range and enriches the colours. In short, a polarizer usually gives you much more pleasing images than photos recorded without the filter. I almost always have a polarizer on my lens when doing outdoor photography. To really understand when and how to use a polarizer refer to my recent post Seven Rules for Effectively Using a Polarizer.

petroglyphs on Signal Hill as a sunset fades in the eastern sky
I used a Singh-Ray LB Warming Polarizer which not only reduced image contrast and created snappier colours, it added extra warmth to the scene with its built-in warming filter. I can’t imagine photographing landscapes without using a polarizer.
What Kind of Polarizer?
“When you are convinced that a polarizer is in your future, you’ll then need to decide which kind of polarizer to get. I like Singh-Ray’s LB Warming Polarizer for two reasons; first, the polarizer only absorbs just over 1 f-stop of light rather than the 2 f-stops which is typical of some other polarizers. Getting a little extra shutter speed is important if you photograph active subjects like wildlife or sports but want the benefit of a polarizer. Secondly, I like the lovely, subtle warm cast that is imparted with the LB Warming Polarizer. If you don’t want the warming colour cast to your photos, then Singh-Ray’s LB Neutral Polarizer may be your best choice.
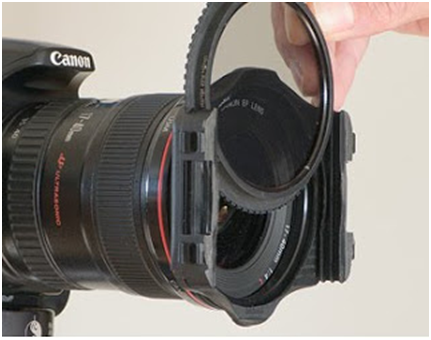
 “Once you decide which polarizer, you need to decide if you will use a screw-in polarizer that attaches to the threads on the front of you lens, or if you are going to go with a filter holder system and use a drop-in polarizer. I discuss these options in detail in a previous article. Personally, I like to use a filter holder system on each of my lenses so I can easily transfer my polarizer from lens to lens and so I can add additional filters like ND grads in front of my polarizer for even more refined contrast control. Photo 2 shows a P-size filter holder that I use to hold a drop-in polarizer, which also has room for ND grad filters.
Graduated ND Filters Provide Local Contrast Control
“In landscape photography, skies are often much brighter than foregrounds and if you properly expose for the foreground, then the overexposed sky washes out. In photo 3, the top image was shot without a grad filter and the bright sky lost all detail. In the bottom image in photo 3, I used a Singh-Ray 3-stop hard-step ND grad filter to darken the sky to properly balance the exposure. From these images, we can see why an ND grad filter is often used to even out the exposure between the bright sky and the darker foreground of the landscape.
What Graduated ND Filters Do I Need?
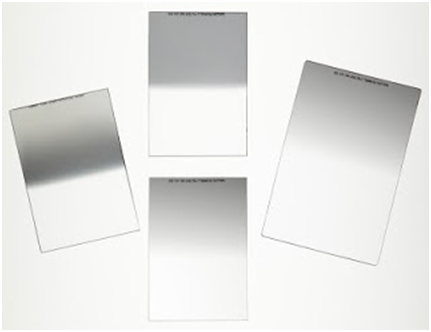
 “Graduated Neutral Density filters (ND grads) come in different strengths and types. Photo 4 shows the various kinds of ND grad filters. Starting at the top is a Singh-Ray P-size (84x120mm) hard-step filter. On the right, we see a larger Singh-Ray 4×6-inch size (100x150mm) ND Grad that has a soft-step transition. At the bottom is a P-sized soft-step ND Grad and to the left is a specialized P-size Reverse ND Grad filter. Each filter type comes in various strengths from 1-stop to 5-stops of density. The challenge for beginners is deciding which type of ND grad filter (hard-step, soft-step or reverse) and which density is most useful. After using ND grads for over 20 years, I have found that just 3 ND grads will cover more than 80% of my needs.
The 3-Stop Soft-Step ND Grad for Water Reflections
“I use a soft-step ND grad mostly for images of lake reflections where I have a foreground that is in the shade and I want to show detail across the frame. For example in Photo 5, I wanted to photograph a sunrise sky reflection but preserve the detail in the rocky shoreline and in the canoe. Without an ND grad, the sky becomes a pale wash. A 3-stop soft-step had enough density in the upper part of the filter to hold back the bright sky. The transition or ‘soft-step’ gradient area slightly darkened the reflection and the clear part of the filter kept the foreground bright. The image at right shows the end result–a perfectly exposed image using the 3-stop soft-step grad.

“The comparison in photo 6 shows a mountain reflection shot without any filters (left) and then with the 3-stop soft-step ND grad (right). The right image has a beautiful realistic tonality that was easily captured in camera just by using the grad filter.
The 2 and 3-stop hard-step ND grads for Defined Horizons or Defined Lines of Shadow and Light
“I use hard-step grads whenever I have a well delineated horizon line like on the prairie, desert or ocean. I also use a hard-step grad whenever I see that the line of shadow and light is well defined. The density of the grad I use (2 or 3-stops) simply depends on how bright the differences are between the shadow and light. Let’s take a look at a couple of examples.

“In photo 7, when I properly exposed for the foreground rocks, the dramatic but brighter sky washed out (left image). Because the horizon line is well defined, a hard-step ND grad worked perfectly well here to hold back the bright sky. In this case, I used a 2-stop hard-step ND grad to even out the exposure (right image). Be careful not to use a filter that’s too strong or else your skies will look overly dark and the image will look ‘off.’ I will often start with the 3-stop hard-step grad first, look at the image on my camera’s LCD and then decide if the grad was too strong. If it is, I will then try my 2-stop grad for a less intense effect.
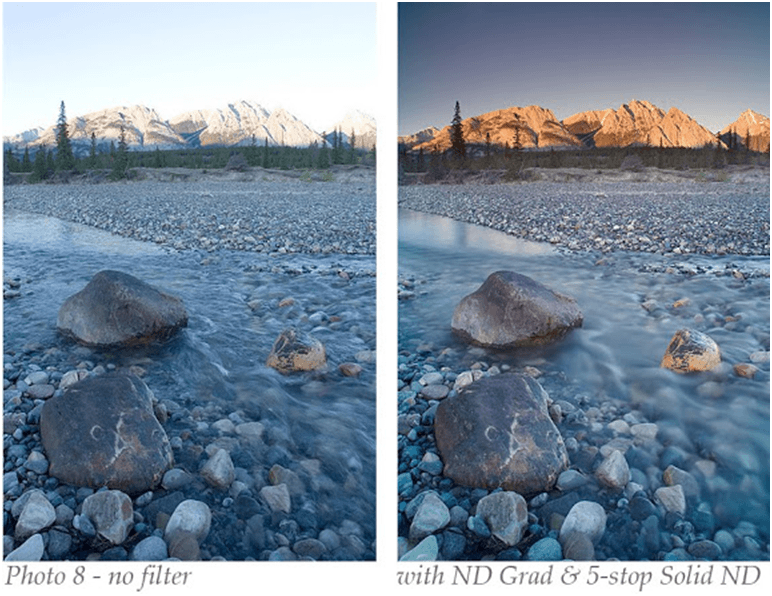
“In photo 8, the horizon is punctuated by the peaks of the mountains and so the horizon is not even. Nevertheless, the light on the mountain peaks is well defined and mostly forms a straight line which allows use of a hard step ND grad. The photo taken without the filter can be seen on the left, while the right side shows the effect with a 3-stop hard-step grad brought over the brighter part of the scene. To precisely place the grad so the hard edge of the ND grad lines up perfectly with the line of light, I used my camera’s depth-of-field preview button to see the effect of aperture on definition of the grad line. (For more information about how aperture choice affects the edge transition of grad filters refer to this article.)
“As a side note I also used another filter in the image on the right which is not a contrast control filter but is a special effects filter. I used the Singh-Ray 5-stop solid neutral density filter to increase exposure time so that the moving water in the scene recorded in a softer, more ‘mystical’ manner. To read more about how I use the 5-stop solid ND filter for creative effects see my article The Terrific Triple Threat.
“Often when I shoot at sunrise or sunset directly into the sun, a 3-stop hard-step grad is not strong enough to hold back the bright sky. In these situations, I will use both the 2 and 3-stop hard-step grads ‘stacked’ together to give me a density of 5-stops to hold back the bright sky. Often this one-two punch is enough to tame the contrast, as in photo 9 – shot with Singh-Ray 2 and 3-stop hard-step grads stacked over the area of sky.
Polarizers and Grads Can Work Together for the Ultimate in Contrast Control
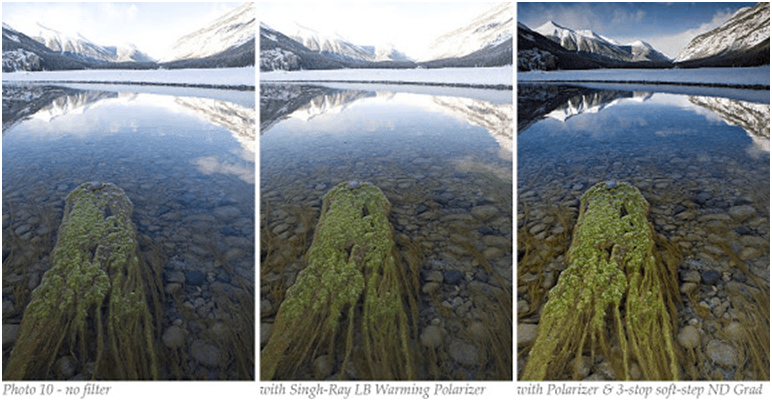
“It is pretty easy to see the differences that filters can make in controlling nature’s often high contrast light. Polarizers are great for taming reflective highlights while Graduated Neutral Density filters are often used to hold down the brightness of sunlit areas or bright skies. When you combine a polarizer and an ND grad you can really begin to deliver a beautiful image that your camera’s sensor will love. In Photo 10, the contrast was just too much for the sensor to record detail across the scene.

“To help remedy the high contrast in this scene, the first filter I grabbed was my Singh-Ray LB Warming Polarizer. The polarizer removed the reflective glare from the water and the algae to produce richer colours. The warming filter also helped remove the blue cast in the shadows. You can see the effects of the polarizer in photo 10 (center).
“In the finished photo 10 (right), I added a Singh-Ray 3-stop soft-step ND Grad because this is a reflection shot where I want the most density over the sky, a little density over the reflection and no density over the foreground. The 3-stop soft-step ND Grad gave me the additional contrast control I needed to balance the light in this scene.
My Essential Contrast Control Filter Kit
“Whenever I go out into nature to make images, I always have my four essential contrast control filters. My Singh-Ray LB Warming Polarizer helps me tame reflective glare and enhance colours and my three Singh-Ray ND Grads (2 and 3-stop hard-step and 3-stop soft-step) help me tame uneven light. With these filters, I can successfully photograph almost any scene. If you prefer to get the best possible captures ‘in the camera’ and wish to spend less time in post-production, then these four filters are the ticket.”