
I am currently teaching an “Inspiration Level” Photography Course. This is for students who have made it through my advanced level courses and are now looking for further refinement of their craft. Each session brings a new challenge and a new exploration of developing images that are both what would be expected from a working photographer and that are created from our own experiences and influences. The assignment this week was still life. During the class discussion we talked through various approaches to the assignment, photographers, and their work and how I, myself, have approached the subject in the past. This starts to build the creative process for each of them – they are exposed to ideas and thoughts of their fellow students. Discussions continue long after class and several of them meet together between classes. At the end of every session, each student draws a specific term, format or source of inspiration that will make the subject unique to them and them alone. This week I chose various songs ranging from the 1960’s to the 1990’s. After drawing one at random from “the challenge bucket”, each of my students had to find the song, listen to it, find the lyrics and anything else they could. Several found videos made for the songs to aid in their thinking process. This first exercise should have conjured an image in their mind, around which, they were to build one still life photograph. In this class, I have explained that I will collaborate and help with the creative process for anyone who asks. I also agreed that I would also do the assignment myself.
Shooting a still life is different than capturing a moment. When photographing a still life subject, you are creating the image, much like painter – it is an image that is personal to you. The subject matter we choose can be symbolic to how we understand a subject and make the vision our own. For my work, I use inanimate objects, unless there is an earthquake, they will remain where I place them. I can wait for the right light or create the right light. I also experiment with composition – adding and subtracting elements, changing my camera position many times through the process. For this exercise, I shot well over 200 frames as I arranged and rearranged the elements.
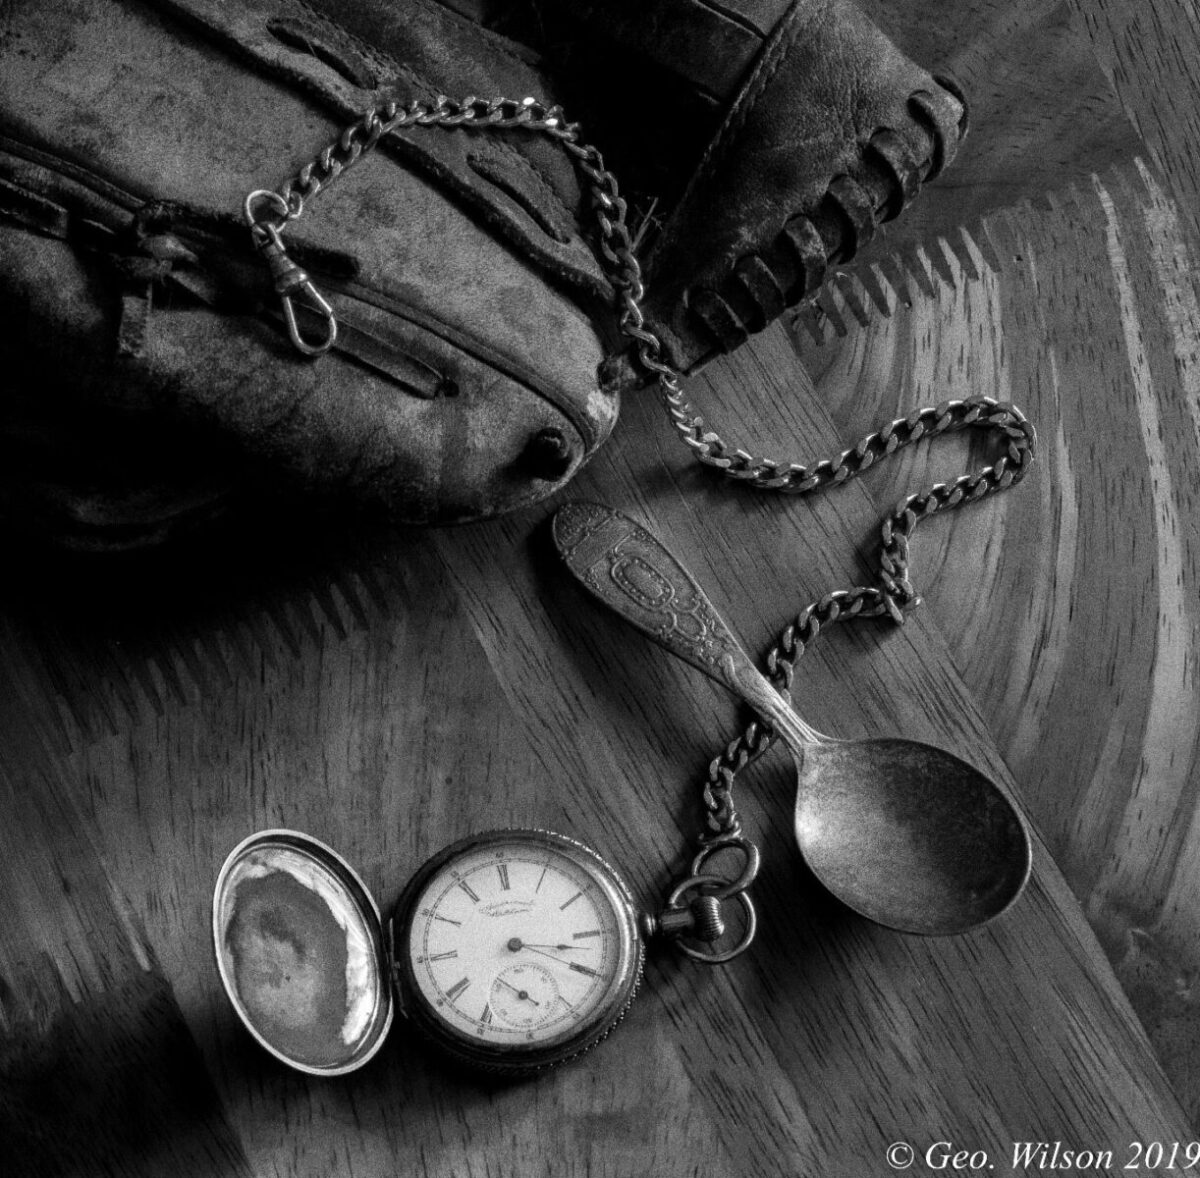
After everyone had drawn their subject from “the challenge bucket”, I reached in, and I drew Harry Chapin’s Cat’s in the Cradle. I was already familiar with the piece, but I still listened to the song several times, while reading along with the lyrics. I was scratching down the symbolism that passed through my mind on a page in a tattered reporter’s notebook.
I thought back to when I was a kid – keying on the phrases “silver spoon”, “teach me to throw” and “if I can find the time”. I went around my home and gathered up an old fielder’s glove of mine, the silver spoon engraved for me when I was born and my great grandfather’s pocket watch. I arranged the items on my kitchen table. I let them stay there until the low angle late afternoon light was passing through my sliding doors. I went back several times to check on things as I waited for the light to be just right. The horizontal light increases texture in an image. Surface textures are important in monochrome images to create textural contrasts. The viewer should be able to imagine the surfaces of the items as they view your image – this allows them to view the image and have an imagined tactile experience. Basically, this allows you to send a message visually, but also stimulate another portion of the viewer’s brain subliminally. Photography is a singular experience. The experience lies first between the photographer and subject and then between the viewer and the image. I decided also that I wanted to increase the grain in the image for a slightly edgy feel. This meant pushing the ISO up to 1000 and shooting in monochrome. Color is for fashion, Black and White is for emotion – emotion is what I was seeking. I also added Singh-Ray’s LB Color Intensifier to the front of my lens. Although I was shooting in black and white, I wanted just a bit of “punch” to the image, which is afforded by the filter. The effect is subtle and not overpowering – perfect for what I was trying to achieve.
The light coming into the kitchen was harsh – too harsh for what I wanted to show. That meant diffusing the light. To diffuse the light falling onto the still life, I reached for my workhorse 5-in-1 MultiDisc Reflector/Diffuser. I pulled out the diffuser panel and saw that it softened the light. I wanted a slight bit of harshness still, so by moving it about three feet away, I was able to adjust the light just as I wanted. Working alone on this project, I also set up a light stand and attached the reflector holder. After attaching the diffuser from the 5-in-1 MultiDisc Reflector/Diffuser, I was ready to proceed again.
Once I had the light I wanted, I went to work arranging the object both for composition and how the light “moved” across each item. I experimented with different positions in relation to the 5-in-1 MultiDisc Reflector. Instead of the small specular light of our sun, I was working with a 32” light source transforming that sun into an even edgy light – perfect for Black and White. I was in a slight rush as the sun is constantly moving, thus changing – from here, I had to work fast. In still life, it as much about the light as the shadows – here I was looking for texture, so shadows were absolutely essential.
I turned on the live view of the camera and started arranging, baseball glove first, then my grandfather’s watch. I attached one of my pocket watch chains to it and it added to the image. Placing the chain partially on the glove, it tied things together. I then added the spoon, but I held it and looked close at the details – my name is on it along with my birthdate and hour that I “came to the world in the usual way” just like the song.