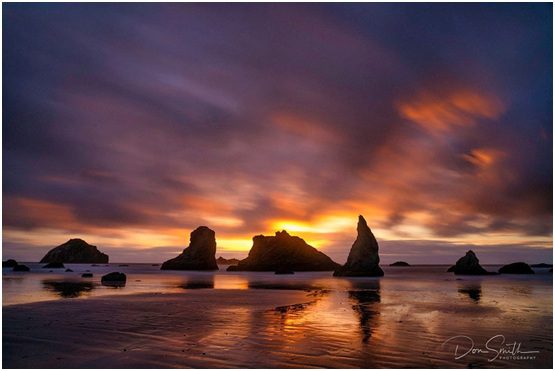
Bandon Beach Sunset, Bandon, Oregon.
Sony a7RIII, Sony 24-105mm, f/16, 88 seconds, ISO 80, Singh-Ray 10-stop Mor-Slo Neutral Density Filter
Recently I posted this image on my social media sites of a sunset at Bandon Beach in Bandon Oregon while teaching a co-workshop with Gary Hart along the Oregon coast.
Questions immediately came in on how I went about figuring out my exposure? What is the proper way to use a neutral density filter?
WHAT IS A NEUTRAL DENSITY FILTER?
First off, for those of you who don’t know what a Neutral Density filter is, here is a simple definition: the purpose of an ND filter is to cut light that is hitting your sensor. The amount of light that it prevents is marked in whole stops of light.
Personally, I carry three Singh-Ray ND filters: 5-stop, 10-stop and 15-stop depending on my needs. Singh-Ray names these filters “Mor-Slo.” They are circular filters that screw-on to the front of your lens.
NOTE: If you have lenses of varying diameters, think of perhaps buying one filter to cover your largest lens then using step-up rings when using smaller diameter lenses.
Why Would You Use a Neutral Density Filter?
The main reason I use an ND filter is to accentuate movement in my image. In the case of the images captured on Bandon Beach, I wanted to accentuate the movement in both the ocean water and the clouds in the sky.
I look for scenes with strong stable elements such as these sea stacks then allow what’s moving to “paint” itself across my frame.
ND’s can help to change the mood and feel of an image and create a different emotional response from your viewers. Without an emotional connection, I feel the image will not work.
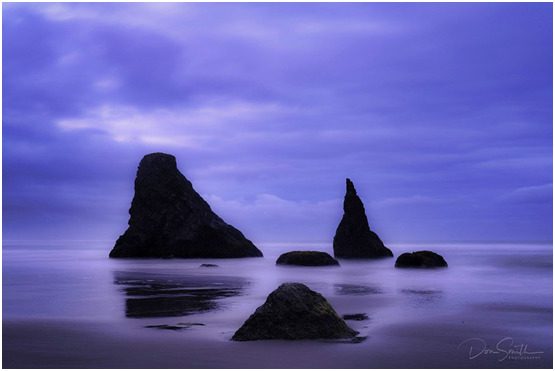
Sony a7RIII, Sony 24-105mm, f/14, 30 seconds, ISO 100, Singh-Ray 5-stop Mor-Slo ND Filter “
With the image above, I opted for a 5-stop ND. This allowed for the water moving between the sea stacks and rocks to take on a mystical look and feel.
How To Calculate Exposure When Using An ND Filter
This seems to be the million-dollar question from my online viewers. ND’s cut light, thus it is hard to see what you are framing. Moreover, there seems to be a lot of confusion when it comes to properly exposing the scene properly.
The most obvious way of dealing with composition is to frame your scene then add the ND filter; however, this is not always necessary. At 30 seconds for the above scene, my digital sensor could accurately show me the scene I was shooting.
It is typically when we get above 30 seconds that we start having problems. Sensors do not have unlimited ability to reproduce a scene regardless of the time of your exposure. Shutter speeds stop at 30 seconds and then one must go into “Bulb” mode to continue with a longer exposure.
So how do we calculate the proper amount of time? Here is where mirrorless cameras really shine. DSLR’s will also but your camera must have a “real-time” Live View setting.
With my Sony a7RIII, once I am at 30 seconds, the only way to affect what I am seeing through my Electronic Viewfinder is to change either the aperture or the ISO. Then Imust apply a little math to get my proper time to keep my shutter open in Bulb. It also helps to have a locking cable release.
For the image above, I stayed at 30 secondsso it was just a matter of setting my aperture, which for this scene was f/14, at the desired ISO.
For the image leading off this blog, I desired a longer “timed-shutter” as I wanted to make sure I got movement in the clouds. Thus, I opened my aperture and watched my histogram at 30 seconds then worked some math. To get the exposure close, I opened the aperture 2 stops from f/16 to f/8. That showed a histogram that looked good. I then reset my aperture to f/16 and added those to stops to my timed-shutter in Bulb: Thirty seconds to 60 seconds gained me one stop and doubling again from 60 seconds to 120 seconds gained me the second stop. Now I reset my aperture and clicked.
Once I clicked that frame exposed, I took a look at the histogram and made sure my Zebra (Highlight Alert) was turned on. I was getting just a bit too much overexposure in the brightest part of the image above the center rock formation, thus I dialed back to what I thought was 90 seconds, which would have cut .5 stop of light, but released the shutter 2 second too soon – no biggie – at that length of exposure no difference would have been recorded.
There are plenty of apps out there that can do the math for you if you prefer, but I find I can work quicker if I just do the math in my head.
Hopefully this clears up any confusion over using ND’s and spurs you to give them a try. If you have any questions, please leave a message and I will get back to you.
Contact Info:
Don Smith Photography LLC
Email:- don@donsmithphotography.com
Website:- www.donsmithphotography.com
Facebook:- @donsmithphoto
Instagram:- @don_smith_photography
Twitter:- @shrkshtr
Sony Artisan of Imagery Professional
Singh-Ray Ambassador