
An eclipse on earth happens when the sun, moon and earth are in alignment creating either a solar or lunar eclipse. The lunar eclipse happens when the earth’s shadow blocks the sun’s light from illuminating the moon. During a solar eclipse, the moon passes directly between Earth and the sun for a brief period of time blocking the light. It is a phenomenon that, for the photographer, is a challenge to capture either digitally or on film.
The rarity of a solar eclipse requires the proper equipment, setup, planning and practice – yes, practice. I strongly emphasize the practice aspect of the process. By practice, I mean photographing the sun before the eclipse takes place. Bear in mind that the full eclipse may only last two to three minutes, so if you are not fully ready, you might miss the opportunity to capture this rare phenomenon. I found the timer on my phone, set to 2-minutes, helped me practice my “shooting window” so that I could capture images, adjust composition, capture more images and repeat. Once I had confidence that I could do this, I determined approximately where in the sky the sun would be at the moment of eclipse. Then I practiced more. It makes the most sense to practice with the sun close to its eclipse position. If you practice mornings or evenings with the sun near the horizon, you will not be prepared for a midday eclipse with the sun overhead.
Practice is an important consideration in capturing an image, but first and foremost should be safety to you and then your camera. First, think of your lens as a magnifying glass. Just like the magnifying glass can focus the sun’s light into a small, focused point and burn paper or leaves, the same could happen to your eyes causing immediate damage to them by burning the retina. My advice here is to use the live view on your camera for both composition and focusing.
Next, consider the ND filter needed. This is absolutely critical, due to the intensity of the light, for protecting your camera. Photographing the eclipse requires between 16 and 20 stops of density in front of your lens. I chose to add a Singh-Ray 15-stop Mor-Slo Solid Neutral Density (ND) Filter first and then stacked a Singh-Ray Vari-ND Variable Neutral Density (ND) Filter in front of that. I was a bit concerned about the vignetting, but at 200mm it did not come into play for the image. The stacking gave me a maximum of 25 stops of density, but the flexibility of the Vari-ND Variable Neutral Density (ND) allowed me to adjust down to 20 stops as for the image. Most solar filters range from 16-20 stops in density. I erred on the safety side of the equation at 20 stops to protect my camera sensor. Practice will help you determine what works best. The sun is more intense in Florida than it may be in Michigan for example. This might allow for 16 stops instead of 20.
Prior to the eclipse, I began by locating a dark colored blanket (to serve as a focusing cloth) and mounting my camera on a tripod in the backyard. The sun is a small target in the sky and the tripod allowed me to keep it in the LCD screen once there. The tripod also allowed me to make small adjustments as the earth rotated on its axis. The LCD screen use allowed me to avoid looking through the viewfinder at the sun, which could cause severe damage to my eyes. Once the camera was mounted, I placed the Singh -Ray 15-stop Mor-Slo Solid Neutral Density (ND) Filter first and then stacked a Singh -Ray Vari-ND Variable Neutral Density (ND) Filter in front of that. I rotated the Vari-ND so that I had about 20 stops of density in front of the camera.
Putting the blanket over my head and over the camera body allowed my eyes to adjust to seeing the LCD screen clearly. It also this also forced me to be in the same alignment with the optical path of the image through the lens, making the sun easier to find. I had practiced this several times previously and each time, I had become quicker getting the sun in the frame.
On the camera, I selected Aperture priority mode, ISO 800 (due to the amount of density I was using) and then a shutter speed of 1/100th.
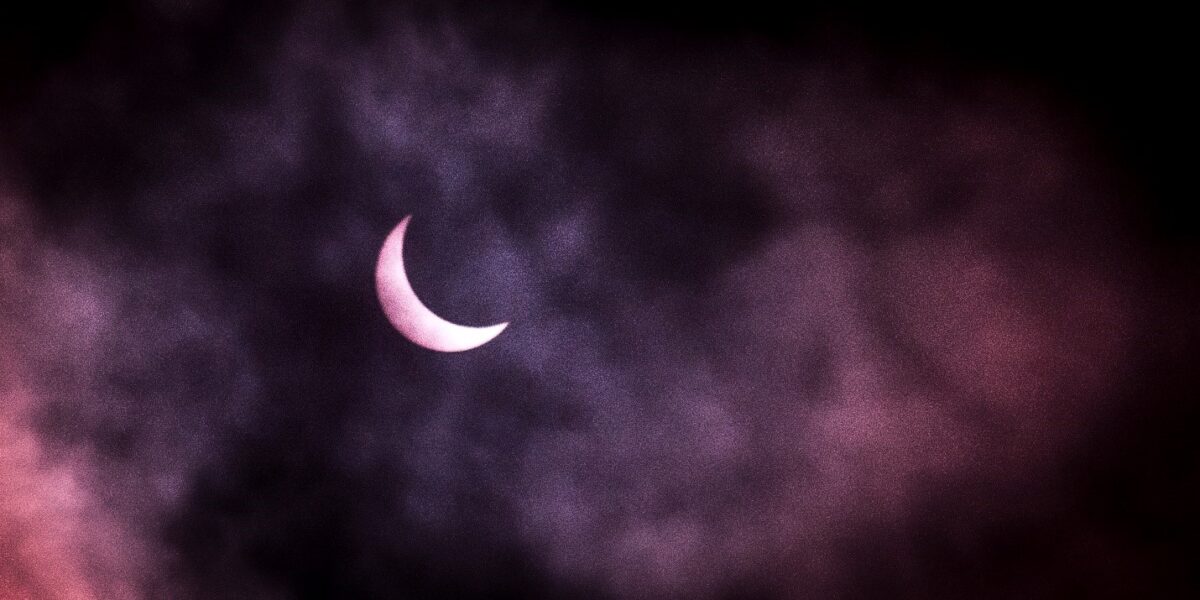
The 2017 eclipse was blocked for the most part by thick clouds, but I still managed to capture a few images through breaks in the clouds. I think the clouds added a little mystery to the image overall. I used a 200mm focal length. This was a bit “short”, but for what my own vision was it worked just as I wanted. I simply cropped the image in post processing. That being said, there is no correct lens length, but I think for a close-up shot the 200mm was a good minimum lens length.
My vision for the image, once I saw the clouds, was based on the old black and white horror movies where the moon was obscured partially by the clouds as the wolf bayed – I don’t know why, but that was just the first thought in my head that day. I tend not to overthink my images or second guess instinctual reactions when photographing things – just let inspiration take its course. As the moon moved over the sun, I began to trip the shutter capturing images. The use of the 80-200mm f2.8 @ 200mm allowed me to readjust less often than I would have with longer glass, say 500mm or longer. Ideally, a tripod with an Astro tracker would be best as the ball head I was using certainly presented some challenges. A geared head or a balanced gimbal would be a much better choice, but I think what I was using worked just fine considering the time between solar eclipses.
Lastly, let me talk about focusing – I turned off the camera’s auto focus. Focusing is a critical element. I first focused the viewfinder to my eyesight. That meant turning off the auto focus and defocusing the view through the viewfinder. I then turned the focus adjustment knob adjacent to the viewfinder until the focus points became sharp. Once complete, the viewfinder was focused for my vision. Just prior to the eclipse and without the Neutral Density in front of the lens, I focused on the moon in the sky and placed gaffers’ tape on the focus ring and body to “lock” focus into place. I do not advocate setting the lens to infinity using lens marks as many lenses allow focusing “beyond infinity” thus creating a slight inaccuracy in the lens focus. This can create a blur to distant objects.
Geo. Wilson Photography